


Wednesday, August 18, 2010
Monday, June 28, 2010
First Week Success!


The NEW SITE is officially off the ground! click here to read more about it, or visit the site NOW!
Visit Deviantly Domesticated--
Monday, June 21, 2010
It's He-re...

What's Here? you ask.
My AWESOME NEW SITE, that's what!
When I started working on the site just before Memorial Day weekend, I thought for sure that it would take me ALL SUMMER LONG to build. But sometimes the stars align and the planets synchronize and the birds sing and VOILA! things happen FAST!
And so it was with the NEW Deviantly Domesticated!
Curious to see more? Check it out at www.stephaniehillberry.com and Sign Up to become a member today!
Monday, June 14, 2010

Wednesday, June 9, 2010
Summer Emails: Did you hear...?


Here's the Latest Summer Email! Read more about the plans for Deviantly Domesticated's NEW HOME, plus some links to get you planting!
Click here--
Monday, June 7, 2010
the Mud Hut
 Look who's been around my place lately...
 And what do you suppose they've been up to?
(ahem...let's just say it has something to do with the "birds and the bees," although technically no bees have been involved.)
 Oh...and they've also been building a nice little residence right above my front door.
We've been referring to it as the "mud hut" since they started construction last week.
 They've been very industrious and have finished the exterior work since I snapped this action shot.
Now it appears that the lady of the hut has devoted herself to some interior design while Mr. Hut looks on and keeps his mouth shut (smart man).
And judging by the (ahem) "recreational" activities we've caught them engaging in on top of the gutter, I'm guessing that the eggs are on their way shortly.
I'll keep you all updated....
Thursday, June 3, 2010
Summer 2010 Emails: Blueberries!
 READ MORE by clicking here!
 note: this is part of my Summer 2010 Email Series. SIGN UP to receive all of my emails automatically HERE!
Wednesday, June 2, 2010
Summer 2010: Stay in Touch!
Deviantly Domesticated may be getting a makeover,
but that doesn't mean the presses have stopped!
but that doesn't mean the presses have stopped!
So, Stay in Touch this Summer via the Links Below!


 Click here for Crafty Girl on Flickr
& here for In the Kitchen on Flickr!
or EMAIL ME at shillberry [at] stephaniehillberry.com to say hello!
Tuesday, June 1, 2010
Please Read: an Important (& Exciting!) Announcement from Stephanie!

Hello Friends and Readers--
I can't believe that summer is already here! It seems like just yesterday that I was preparing for the holidays, and now it's time for swimsuits and beach towels and mindless fiction (hooray!).
For me, summer is always a time for fun and a fresh burst of creative energy! Which is why there are TWO important things I want to share with your today regarding this summer!
NUMBER ONE: I am creating a BRAND NEW HOME for Deviantly Domesticated (YAY!) and I am REALLY excited about it! You see, for a very long time I've been searching for a way to make the ideas on this blog come to life beyond my little home office and into the lives of other women. I want all of us to be "deviantly domesticated" and to wildly flourish in the life beyond the 9-5 norm. SO...this new site will have all of the usual projects, posts and photos from me, BUT it will also have some compelling new features for YOU too! (I can't wait!)
NUMBER TWO: But before the new site is up, I'll be busy-as-a-bee building its new home, and so I'm going to tweak my summer posting routine a bit.
Translation: I probably won't be updating every day.
But WAIT! you might be thinking. We read everyday! What are we going to do!?
Well, I'm glad you asked, because I have a plan! Rest assured that I'll still be here working every day, and I have THREE fun, alternative ways for you to stay inspired and in touch. They are:
:: Email! I am going to be enhancing my email newsletter for the summer, meaning more emails, projects, photos, etc. In other words, you'll see a lot of the same content that I normally post on this blog (PLUS updates on the new site!!) only it will be delivered directly to your inbox instead. SOOOO...if you aren't signed up for my newsletter, DO IT NOW! (CLICK HERE)
:: Facebook & Twitter! I might not be updating here daily, but you can bet that I will be on FB and Twitter daily, uploading photos and links and making pithy statements. So for a daily dose of Steph, just visit me HERE (Facebook) and HERE (Twitter)!
:: Flickr! I've created TWO inspirational groups for you to visit and participate in during the summer (and beyond!)--Crafty Girl and In the Kitchen. I'll be uploading all my summer project photos & tasty food images to these groups, and hope that you will do the same! Visit HERE (Crafty Girl) and HERE (In the Kitchen) to get started now!
If you haven't caught on by now, I'm pretty excited about the future, and am actually looking forward to working this summer! (I know--crazy, right?) So without further adieu, I will leave you to do just that! You'll be hearing from me soon!
--steph
Friday, May 28, 2010
Welcome Summer!

There are just three things I have to say today:
1. It is supposed to be 91 degrees here.
2. My neighborhood pool just opened.
3. I have a new swimsuit.
And that about sums up my plans....
Happy (Long) Memorial Weekend!
PSST! Make sure to check back in on Tuesday because I have some BIG SUMMER ANNOUNCEMENTS that you don't want to miss!
Thursday, May 27, 2010
6 Tips for Redesigning a Room (from a mildly obsessed decorator)
 Today is the final "design fever" day, and I thought I would close with some tips on redesigning a room.
And just what qualifies me to give tips? you might ask. No, I do not have a degree in interior-design. I have not been on HGTV's Design Star. I've never even known a decorator. BUT...
...I have redesigned every room in my house at least THREE times over! So I think that makes me sorta an expert (or insane, if you ask Craig).
 Before jumping into the tips, I thought I would refresh your memory as to what my office looked like before last weekend. Right away you can see that it was a cluttered mess.
  The walls were brown. The sofa was frumpy. The accessories had run a-muck. And the layout wasn't open.
 Now here is a shot from one angle of the recent redesign. I physically breathe in a sigh of relief when I see the difference. So, how did I get from the dark, dumpy mess above to this? Well, let me tell you:
1. First, I started with a clean slate.
I removed everything but the basic furnishings. I took down the pictures, cleared everything off the desk & table tops, removed the throw pillows and blankets, took away the frames & boxes & trinkets & knick knacks & candles. I pulled down the curtains and cleared off the shelves. And then I pushed the furniture into the middle of room so that I could...
 2. Use paint to set the tone.
After the room was cleared, the next step was to paint. Nothing, in my opinion, refreshes a room like a fresh coat in a new color. Plus all of that climbing and stretching to reach tall corners and low baseboards is a good workout.
A word on colors...when I first moved into this house I painted every room a different color to suit my mood. Since then, however, I've slowly but surely narrowed down my palette to about a half-dozen choices. And 90% of them coordinate really well. So basically what I'm saying is don't resurrect your fondness for Rainbow Bright when painting. Unless, of course, you like repainting every year.
 3. The next thing I do after painting is to lay a color/style foundation with fabric. As in pillows, rugs, blankets, etc. Because I can sew, I skip the stores and just make slipcovers for all of my accessories myself (probably each pillow in my house has at least 3 covers that I rotate depending on the time of year). And when I get tired of them (which I frequently do), I just switch them out for a new design.
 4. Once I've picked my color/style, I start putting the room back together. This is the point when I usually rearrange things to make the room function better if it hasn't been.
 Take, for instance, my office. I used to leave my sewing table open and under the window because that is where the electrical outlet is. But thanks to my hubby's suggestion, I picked up a packet of furniture gliders from the store so that I can move the table over to the outlet only when I need to sew. Now when it's not in use, I just fold it up and move it to a corner, opening up a HUGE space along the wall and window.
 5. Then I bring the accessories/knickknacks back in WITH CAUTION. In other words, I usually leave out at least of half of what was in the room originally.
 So, for instance, though I liked the votive candles on my table, the pictures, the cute little boxes that I keep beads in, the garden pot full of paintbrushes, the corkboards tacked with notes, etc. etc., I didn't bring any of it back into the room. And a week later, I can't say I miss any of it. It's amazing how much clutter we collect, isn't it!
6. Finally, I add the finishing touches--like the pearl chandelier, the floor-length sheer curtains, the faux-wood wall decals, and the grapefruit-scented fragrance decanter on my desk. And I sit back and enjoy...
...for about a season
...until I decide I want to change it again.
What do y'all think of my final design? I think it's a HUGE improvement, but would love your thoughts. Post 'em below!
Wednesday, May 26, 2010
Design Fever: Accent Wall
 Do you see this wall right here? The one behind the sofa? Well, let me tell you a little history about this wall. First off, it is important to understand that this wall is THE accent wall in my office, meaning that it is the very first thing you see when you come into the room. And so naturally I've always felt compelled to make it stand out in one way or another.
My first decision--years ago--was to paint it red. This was back when everyone, it seemed, was having a grand love affair with red accent walls. And so I thought I would join the club. Naturally it was a total disaster and lasted less than a year. I replaced it with a camel/caramel brown, and painted the other walls the same. That is what you see here in the photo below:
 The color was actually a nice choice, but since it was the same as the other three walls, I had to use art to make THE wall stand out.
 And obviously failed miserably. I mean, have you ever seen such a hodgepodge of random pieces? Individually I like all of them; together they're a mess.
Needless to say, it was time to start over again from scratch.
 Obviously you can tell from the photos that the first thing I did was replace the camel brown with a grayish-blue. And in spite of what Craig says (I believe "sanitarium" is the word he keeps using), I like it.
 Once the painting was finished, I had to figure out what to do with the blank space, and as I mentioned on Friday, I was attracted to the idea of doing wall decals.
Attracted to it, but not nearly patient enough to wait for something to come in the mail. So I decided to design some decals myself using contact paper.
 I spent several hours on Sunday brainstorming design ideas. The above images are a few of the options I considered. I loved the nature-inspired themes that I displayed on Friday, but decided that I needed something to tone down the femininity in the room since the pillow covers, sheer curtains and pearl chandelier were already making a very girly combo. And so shapes trumped leaves, branches and flowers.
 I had a difficult time deciding which design I was going to adopt, and in the end I confess that simplicity persuaded my final decision. Perhaps not as elaborate as some of the options above, my ultimate design was, in a word, EASY. And after 48 hours of painting and sewing non-stop, I was very much in the mood for easy.
 So this little rectangular motif was the winner. It took me all of 30 minutes to create and assemble. And about 99 cents. The only tools I needed were some scissors, a pencil and a level.
I didn't have any rules about spacing, pattern, etc. I just cut a random number of decals in two sizes and started placing them on the wall, eyeballing the distances between them. And frankly after two days of work and a bit of a paint-fume-headache, I'm surprised they turned out as well as they did.
 Perhaps you all might have preferred one of the more elaborate styles I considered, but sometimes (particularly after a long weekend painting) simplicity just works better. Besides, I can always pick one of the fancier designs later and try it out--because that is the beauty of vinyl decals.
But for now I'm just going to admire my 99 cent rectangles and call it a day.
After all, it sure beats the red!
Monday, May 24, 2010
More Design Fever: Pillows
 It has taken me awhile to wake-up this morning. I suppose that my grogginess could be due to the usual Monday malaise. Or perhaps residual fatigue from a weekend afternoon of yardwork. Or maybe...just maybe...
...it's because I completely redecorated my office in 48 hours.
Do you remember this? I posted this "before" photo this past winter as part of my "winter renovation" project. However, as I confessed last Friday, my winter renovation turned into a spring affair. A spring affair that started and ended (well, mainly ended) during the past three days. (translation: I've been busy!) I won't go into the whole makeover this morning, but I definitely will start with the pillows. Though they were not the first project in the renovation, they are the most colorful.
 Now, like with most of the designing I do, I tried to stick as much as possible to repurposing things I already had. And these pillows were no exception. A good friend of mine handed these pillow forms off to me at least a year ago, where they've been quietly collecting dust in the basement since.
 Though neglected, I knew that the pillows would come in handy eventually--and Friday was the day.
 Now, my top choice for a renovation would be to completely reupholster the sofa, which, unfortunately, is a task that far exceeds my skill level. Therefore, Plan B was to ditch the back-rest cushions that came with the sofa (furniture we inherited from my hub's parents) and replace them with these hand-me-down pillows.
But first I had to cover them.
 Since it is spring, I wanted something that was fresh and light. And something that I could create from my box of fabric scraps. So after some cutting and stitching, I came up with these covers.
At least half of the fabric you see is actually from my old clothing--a pair of khaki trousers that never fit, for instance, and some old shirts in coral and blue. The other half come mainly from fabric remnants I've collected from the craft store over the years for pennies on the dollar.
 The final result, I think, turned out better than I planned. The cushions are extremely comfy, and the colors and design are perfect for the warm months that stretch ahead. Best of all, I got a totally new look for a bargain!
What do you think of my renovation so far?
Friday, May 21, 2010
The Fever is Back
note: click the images to learn more about these decals from handmade sellers on Etsy.
 It's happening again. I knew when I first woke up. I could sense it before my eyelids even opened. A perfectly normal day...interrupted. To-do lists were about to go by the wayside. Regular clothes were in danger of being replaced by rags. Why? One simple reason--
The design fever was back.
 Now, some of you have asked me "hey, whatever happened to that winter renovation you were working on?" Well, apparently the winter just wasn't my time. I had other things to do. What I thought was the fever setting in was just a false alarm. And maybe, just maybe, this is a false alarm too.
But my obsession with wall decals this morning suggests otherwise.
 Yes, yes--I know. I had other plans to paint my office walls. But plans change. After thinking about all of the work it would take to create elaborate designs on my wall, I occurred to me that maybe--just maybe--I should delegate the labor. Like, say, with wall decals.
What do you think?
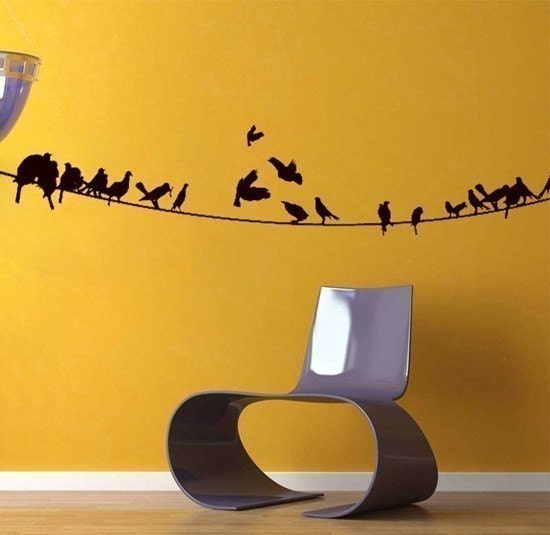
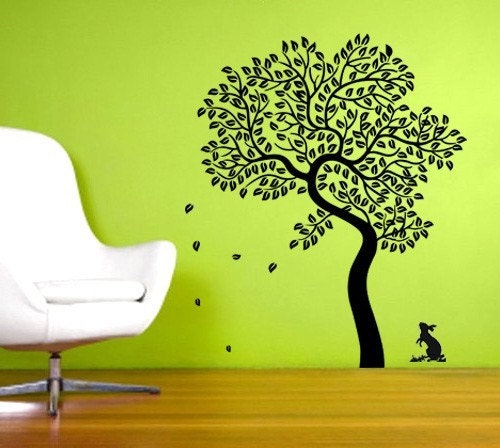
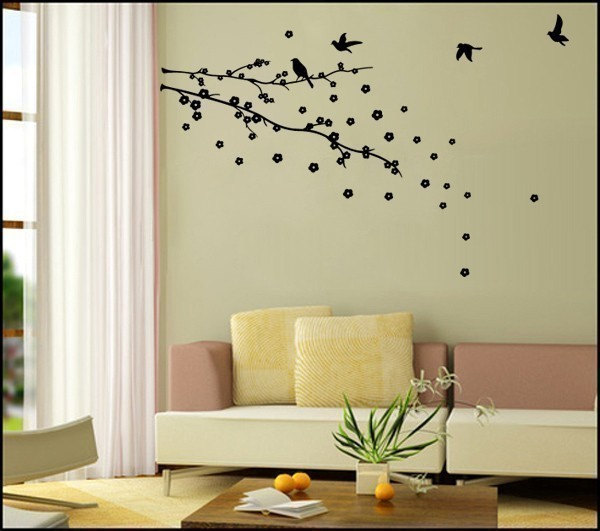 I've selected a handful that I like here, and obviously have some decisions to make. There are some lovely nature scenes, don't you think? The trees and birds? I'm drawn to the delicate leaves. And since it's almost summer, bringing the outdoors to the inside of my office is appealing.
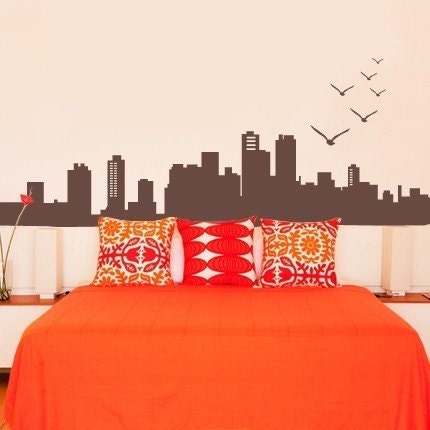
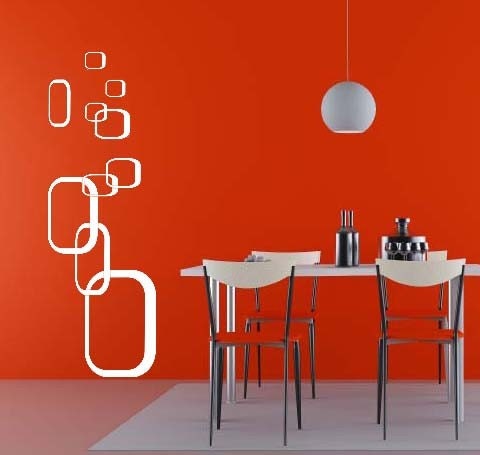
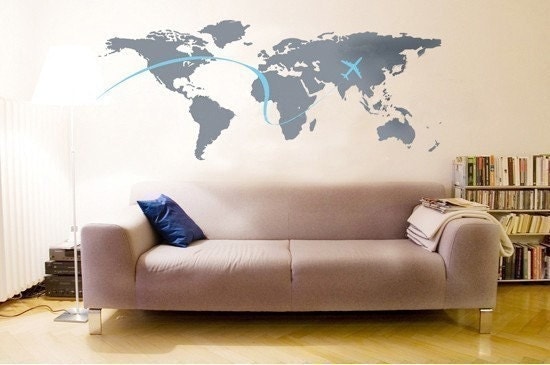 Nature aside, there's another part of me that is drawn to retro shapes, maps and cityscapes. This option would obviously be less traditional & more modern.
 Of course, the whole point of wall decals (in addition to their time-saving appeal) is that you can change them out when you get tired of a motif. So, say, if I want nature for the summer, I can still have retro shapes in the winter. Or cityscapes. Or pine trees (I can't imagine having this last one--but they're available, just in case).
Soooo...what is your preference? Nature? Skyscrapers? Adorable animals? (just kidding--I don't want my office to look like a nursery.) Share by posting your thoughts below!
In the meantime, don't be surprised if I show up on Monday with an entirely different office.
Because that's just how the fever works.
It's happening again. I knew when I first woke up. I could sense it before my eyelids even opened. A perfectly normal day...interrupted. To-do lists were about to go by the wayside. Regular clothes were in danger of being replaced by rags. Why? One simple reason--The design fever was back.
Now, some of you have asked me "hey, whatever happened to that winter renovation you were working on?" Well, apparently the winter just wasn't my time. I had other things to do. What I thought was the fever setting in was just a false alarm. And maybe, just maybe, this is a false alarm too.But my obsession with wall decals this morning suggests otherwise.
Yes, yes--I know. I had other plans to paint my office walls. But plans change. After thinking about all of the work it would take to create elaborate designs on my wall, I occurred to me that maybe--just maybe--I should delegate the labor. Like, say, with wall decals.What do you think?
I've selected a handful that I like here, and obviously have some decisions to make. There are some lovely nature scenes, don't you think? The trees and birds? I'm drawn to the delicate leaves. And since it's almost summer, bringing the outdoors to the inside of my office is appealing.Nature aside, there's another part of me that is drawn to retro shapes, maps and cityscapes. This option would obviously be less traditional & more modern. Of course, the whole point of wall decals (in addition to their time-saving appeal) is that you can change them out when you get tired of a motif. So, say, if I want nature for the summer, I can still have retro shapes in the winter. Or cityscapes. Or pine trees (I can't imagine having this last one--but they're available, just in case).Soooo...what is your preference? Nature? Skyscrapers? Adorable animals? (just kidding--I don't want my office to look like a nursery.) Share by posting your thoughts below!
In the meantime, don't be surprised if I show up on Monday with an entirely different office.
Because that's just how the fever works.
Thursday, May 20, 2010
How Resourceful! Alterations to a Red Blouse
 This weekend I spent a couple hours browsing the local Habitat for Humanity just to see if I could find some thrifty goodies (read here to see what Craig's normal reaction is when I go to the thrift store...).
 And after finding several charming mid-century dressers that I have absolutely no room for, I meandered over to the clothing and picked up three shirts for a grand total of $2.70.
This red blouse was one of them.
 I was drawn to the shirt for three reasons:
1. the color. I think I must be going through a red phase because it's been popping up in my wardrobe a lot lately.
2. the front pleats. I love the way they drape down the front and remind me of a vintage-era.
3. the fabric. It's 100% silk. When you find 100% silk for less than a dollar, you buy it, people! You buy it!
BUT, as you can see by the image above, the blouse is rather frumpy. As in I'm pretty sure the last person to own it was in her sunset years. So I've brainstormed some alterations and I want you to tell me what you think...
 First, I want to cut off those billowy sleeves! But rather than just take the sleeves off at the seam, I want to cut into the blouse yoke, exposing the shoulders. This line reminds me of a halter style except that the back will be closed rather than open.
What do you think so far?
 Then I need to do some tailoring. I'm thinking that I will need some darts at the bustline for shape, and will probably also have to take-in the side seams a little too.
I'm hoping that these two quickie alterations will forever banish the potato-sack shape.
 And this, my friends, is the final vision I have for this blouse. Silky, drapey, and not at all like your grandmother's Sunday top. Of course, this will be my first attempt at this combination of alterations, so we'll see how it goes. I suppose that if I make a total disaster out of it, I can create a lovely silk accessory out of the fabric instead.
Either way, this thrift store find for under a dollar has a lot of potential. I'll post the finished project when it's complete!
Any thoughts on my design or sewing tips you'd like to share? Post your comments below!
Subscribe to:
Posts (Atom)

