skip to main |
skip to sidebar
 What do 2 embroidery hoops, some used Christmas garland, metallic craft paint and fishing line have in common?
 They are the key "ingredients" I used to make my newest retro-inspired lighting feature for my office makeover--
 This was truly a project inspired by necessity (as in I don't have enough money to do what I want, so I better figure out Plan B!). My original lighting concept for the room involved swing arm sconces. I've been lusting after the sconces showcased at Pottery Barn, and was desperately trying to figure out a way to get my hands on one or two of them.
  However, Pottery Barn swing arm sconces exceeded my budget for this little room renovation, and I was hesitant to ask for them for my birthday. Lighting is fun and all...but for a birthday? Snooze....
  Furthermore, though sconces are lovely, they lack a certain retro sparkle that I was secretly dreaming of. Hidden behind my utilitarian convictions was a desire for shimmer and glamor, reminiscent of vintage Hollywood.
  Thus, with a little creative willpower I was able to craft this beautiful pendant out of some very simple and inexpensive items. The strands of faux pearls are Christmas garlands that have adorned our holiday tree for 7 years (in other words, they were basically free, and another great example of repurposing something I already own!), and they are attached to two embroidery hoops using basic craft wire. A lighting kit furnished by Pier 1 for $10, and some nifty fishing wire paired to create the necessary suspension, and Voila! retro glam achieved!
 The final flourish, I think, might be some sparkly sequined touches, but more on that later!
I'll most likely be listing this lighting project as one of my PDF patterns shortly, so stay tuned if you're interested in more detailed instructions!
Until then--happy Sunday!
 I have a radical idea that might change the way we think about Mondays. Radical. Let's call it "champagne-sparkle Monday." It is sorta like "casual Friday," only much, much more exciting. Because instead of denim and comfortable shoes, we could wear cocktail dresses and fancy heels. And instead of water or coffee, we could offer our clients/customers champagne instead (while also enjoying a flute or two ourselves).
I think it's a fabulous idea. It would really take the edge off of a Monday morning, don't you think? Employers around the country would gladly go for it.
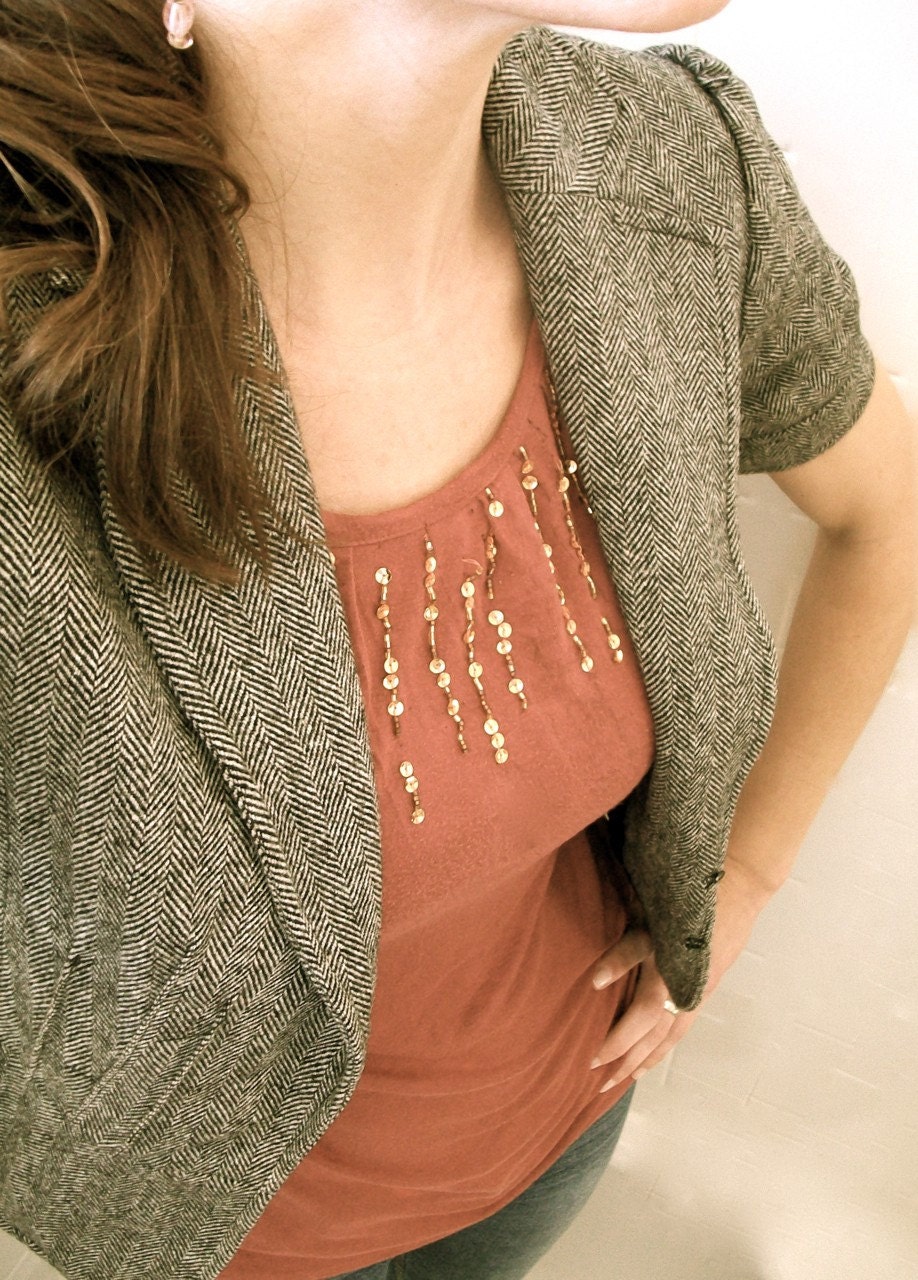
Okay...maybe not. Alright, so perhaps champagne isn't realistic, and cocktail dresses aren't practical, but at the very least we could spice up our Mondays (or any other day of the week for that matter) with a little sparkle. Just a hint. Like in this top I designed using an old tank top I had.
 I call it the Sparkle Holiday Top, but really you could wear it just about anytime. Because sequins and beads aren't just for the holidays or parties.
Oh no. Sequins are for anytime.
Anytime, people.
 Now admittedly you can go overboard with the sparkle-factor, and turn heads in a bad way. But I created this design to be a bit understated--more like a necklace for your collar than a showgirl ensemble. You can certainly wear it with a pair of jeans and a jacket or cardigan without looking out of place.
 Or you could dial it up and pair it with a pencil skirt and kitten heels for a holiday soiree. Like, say, a New Year's party, where there really might be champagne to add to your sparkle!
 Undoubtedly I will be wearing my Sparkle top all year long, because I like a little bit of glamour for everyday. Just a hint.
If you're looking for a little glamour in your life this season, consider making this top yourself. All you need is a plain tank top, dress, sweater or shirt, a handful of beads and/or sequins, and needle and thread. I provide a trace-on template in my pattern, so you don't even have to fiddle with the design if you don't want!
You could even wear it to work next Monday. Just save the champagne for after your day ends.
To learn more about this DIY pattern, and others, click here!
 I've been very distracted lately with design projects. I'm not sure why this happens to me. Maybe it's a genetic disorder. Or some kind of syndrome. And although normally it complicates my ability to focus on important things like...say...work, sometimes it comes in handy for illustrating a point.And the point, naturally, has to do with originality since this is the final week (sniff sniff) of our series on Being an Original. During this final week I want to focus on one of my favorite themes: creatively adapting our existing resources to fit a need.
A need for new art, as in my case. Take the above canvas, for instance. It was formerly a lovely Tuscan scene, painted by someone with more skill than myself. Lovely indeed, but entirely inappropriate for the design of my home. Like my inevitable future feelings for my skinny jeans, I wondered "what was I thinking?" when I glanced at the painting recently. And so I decided to adapt the canvas.
Some paint, some faux bois contact paper, and Voila! A pretty stag head on gray-blue. And even though my husband says it's creepy, I love it.
 With my "stag success" (try using that phrase in a sentence today...), I moved onto another lackluster canvas. This pretty frame was once a floral scene perfect for adorning the walls of a hotel room. In other words, it was ridiculously generic.
So last spring I decided to give it an upgrade by painting over the floral motif and creating a fabric collage on the surface with remnants and spray adhesive.
Bad idea.
And then I saw this photo, courtesy of the Pioneer Woman, and suddenly I knew what Really should have been in the frame all along.
 Which is steers butting heads. My husband and I are both pretty stubborn, so I figured it was a fitting image for our home. I'm the one on the right--can't you tell?
 By this point I was really on a roll, so I decided to decoupage a lovely photo from a magazine onto this piece of wood.
It looked like first grade art.
Plan B, therefore, was to take off the image using some water and a knife and repaint. But lo and behold, under the pretty picture was an imprint of the opposite page, stamped right onto the wood. And I love it.
Even accidents can be more original than expected!
The point is that often what we need to create original spaces and clothing and gifts already exists in our home. We just need to practice our skills of adaptation. It all starts with the question: what do you have?
But more on that tomorrow! Cheers!
 I've been watching a little Project Runway lately, so when Mrs. Marple gave a chat today about embracing flexibility, I couldn't help but think of the show. After all, those designers would never get anything down the runway if they stumbled over every little detail like perfectionists.
Or at least that is what I like to think as I'm trying to assemble my own fashion creation.
The last time you saw this dress, it had 3/4 sleeves and a scarf around the neck.
Well...as you can see, it's evolved. I wish I could say this evolution was intentional, but mainly I'm channeling Tim Gunn by "making it work."
Because the truth is that those 3/4 sleeves were so tight that I couldn't raise my arms above my shoulders. So I had a choice to make: either re-do the sleeves into something shorter, or pray that I don't have to do the YMCA at the wedding I'm attending in this dress.
I opted for the seam ripper, and yanked the sleeves out.
As for the neckline, obviously it has gone all ruffly (is "ruffly" a word?). Partly this is because I really am obsessed with ruffles this Fall. And also because the dress was gaping in the front.
 And when I mean gaping, I mean that I couldn't wear it in polite company without some modifications. Like, say, a 4 inch neckline to hide my bust. I don't want to have some kind of "wardrobe malfunction," if you know what I mean...
 The moral of the story with this dress-in-process is that Mr. Gunn is right--sometimes you just have to make it work. In order to be resourceful (aka not wasteful), creative problem solving is often required.
Of course Mrs. Marple is also right--perfectionism won't get me nearly as far as flexibility. So my bodice was vulgar and my sleeves effectively turned my dress into a straight jacket. Rather than give up and head out to the closest boutique (J. Crew is calling my name...), I'm hoping to make the most of my construction errors, and let my sewing shortcomings stretch my creative muscle.
In the end, I still might have to keep my eye open for a Plan B back-up dress, but maybe I really will be able to Make it Work!
Previous Days at the Institute:
Day 15: Redux
Day 14: Alterations
Day 13: Rest
 Today in Mrs. Marple's class we learned about transforming the old and boring into the new and fun.
 Otherwise known as taking my bland cable sweater that I purchased five years ago from Wal-Mart and converting it into a chic new cardigan.
 When Mrs. Marple started the lecture by asking us to think of something that we already own that had perhaps lost its luster, I immediately considered this sweater.
And my recent obsession with ruffles. She then encouraged us to start envisioning that item as something else. I saw a cardigan with three-quarter sleeves. So, casting fear aside, I took my fabric shears and cut this sweater right down the middle.
 Then I rather unceremoniously chopped the sleeves off at the elbows.
 And then it was time to embellish. I rummaged through my fabric stash and located this soft gray checkered remnant that I salvaged from Habitat for Humanity's thrift store.
I knew it would be a perfect fit for the ruffles.
 After some brainstorming, I decided that the best thing to do was fold under the raw edges on each strip, making sure to sew a zig-zag stitch along the sides to prevent fraying.
 Then, after finishing four strips, I tucked and pinned each ruffle into place, which doesn't take as long as you might think. Plus I was simultaneously watching previous episodes of Glee while pinning (have you seen that show!? It's probably my new favorite. And yes--I once was a choir geek.)
 I wasn't too worried about perfection here, because really--is someone going to measure my ruffles to make sure they're all the same width? I think not! And if they tried, I'd probably have to harm them, because that's just plain weird.
Consider yourself warned.
 Once the ruffles were pinned and stitched onto the cardigan, I sewed the sleeve cuffs back onto the sleeves (cleverly making sure that they could fold up--this took some problem solving and lots of second guessing...) and then I sewed hooks-and-eyes along the middle to close the sweater.
 Finally, I finished it all off with a slender belt.
And now that I've finished prancing around the house in my old-now-new cardigan, and bragging gratuitously to my husband about how I didn't spend any money on my newest fashion find, I should pause and thank Mrs. Marple for having such a good idea.
Frankly I can't wait to hunt through my closet to see what other cast-offs I can find!
See you tomorrow!
Previous Days at the Institute:
Day 10: the balancing act (as told through vintage advertisements)
Day 9: pink, pink & pink
Day 6: premade hostess


 What do 2 embroidery hoops, some used Christmas garland, metallic craft paint and fishing line have in common?
 They are the key "ingredients" I used to make my newest retro-inspired lighting feature for my office makeover--
 This was truly a project inspired by necessity (as in I don't have enough money to do what I want, so I better figure out Plan B!). My original lighting concept for the room involved swing arm sconces. I've been lusting after the sconces showcased at Pottery Barn, and was desperately trying to figure out a way to get my hands on one or two of them.
  However, Pottery Barn swing arm sconces exceeded my budget for this little room renovation, and I was hesitant to ask for them for my birthday. Lighting is fun and all...but for a birthday? Snooze....
  Furthermore, though sconces are lovely, they lack a certain retro sparkle that I was secretly dreaming of. Hidden behind my utilitarian convictions was a desire for shimmer and glamor, reminiscent of vintage Hollywood.
  Thus, with a little creative willpower I was able to craft this beautiful pendant out of some very simple and inexpensive items. The strands of faux pearls are Christmas garlands that have adorned our holiday tree for 7 years (in other words, they were basically free, and another great example of repurposing something I already own!), and they are attached to two embroidery hoops using basic craft wire. A lighting kit furnished by Pier 1 for $10, and some nifty fishing wire paired to create the necessary suspension, and Voila! retro glam achieved!
 The final flourish, I think, might be some sparkly sequined touches, but more on that later!